
Wednesday, May 9, 2012
Burning and Dodging
Burning and dodging are simple techniques used to to lighten and darken certain parts of the photograph instead of just the whole image in general. There are many different ways to go about this process, but it is very simple and easy to accomplish the photograph you were looking for.
Double Exposure
Another cool technique that can be done in the darkroom is a double exposure. This is down with another very simple process that I will briefly explain.
 The first thing that needs to be done, is two negatives have to be examined and chosen as the two perfect matches to make a beautiful image. Once the two images are picked, exposure times for both pictures must be found. So each image has to be developed first before they can be developed together. Once the two exposure times are found, the real magic begins.
 First you must pick the base image and place it into the enlarger. Expose it for the amount of time you have already found. Once it has been exposed you then replace the first image with the second and continue the same process.
 Some the crazy photographs are created this way. The developing process is done the exact same way as a regular image and in the end there will probably have to be a little adjustment will have to be made if one picture appears too much darker than the other, but that can also be a uniqueness about them.


Solarisation
One of the coolest things you can do in the darkroom is called solarisation. It is a type of effect where the picture is exposed just right so you can see the outline of all your images, but also gives off a dark eerie image.
 The process is actually really simple. To start it off, you have to figure out your prints original exposure time. The real complicated part doesn't even start until you reach the chemicals. When your picture first starts to develop in the developer, you must quickly take the image out and expose it under a light for approximately 3 seconds. This causes the photo to keep its original outline, but become considerably darker throughout the details of the picture.

After exposing the photo, you continue the developing process as if it were a regular image. When you are done you get some pretty photographs, that otherwise could of looked bland if just developed regularly.


After exposing the photo, you continue the developing process as if it were a regular image. When you are done you get some pretty photographs, that otherwise could of looked bland if just developed regularly.
Monday, April 23, 2012
Tuesday, April 3, 2012
Wolfe's Camera Shop
For those in the Topeka area, Wolfe's Camera Shop is the place to go for all your camera needs. Check it out sometime if you are just stopping through, or want to find the perfect camera just for you!
Wolfe's Camera Shop
View Larger Map
Wolfe's Camera Shop
View Larger Map
Photograms
One of the great things about photography is that you don't even need a camera to make art!
In every photography class I have ever taken, we have always started out with photograms to get us used to the enlargers and chemicals in the dark room.
The process is so easy! All you have to do is simply lay objects on a film paper, shine the enlarger light, develop the print, and BAM you have a photogram!
It doesn't even matter what objects you use for this project. Opaque, transparent, or even an object with crazy designs cut out can make for an awesome print. I have even accomplished this project by just using my own body parts such as my hands or even my hair to create cool designs.
Tuesday, March 6, 2012
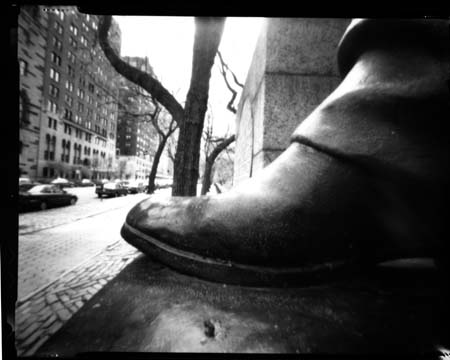
Pinhole Cameras
When starting out in Film Photography, it is very to just start out with the simplest form of camera, which is a Pinhole Camera. The basic functions of a camera are present, without the hassle of lenses, f/stops and shutter speeds.


Subscribe to:
Posts (Atom)